Elab Internship: Conclusion

Internship Conclusion

Wednesday, July 29th, 2015

Mars Check-In System

I have successfully developed the Mars Check-In system, a three application suit paired with hardware that allows for the management and accountability of a student population.

Mars Server

The Mars server is a single-window application that interacts with all other Mars programs. Using single and double encryption protocol, the Server receives queries from Mars Modules, the Mars Remote Control, and the Mars Attendance Tool, which is logs into a local database before responding appropriately. The Server currently operates on OS X Yosemite 10.10.4 using the Java Runtime Environment 8u51. The system specifications are universal in the Mars Suite.

Mars Remote Control

The Mars Remote Control is a single-window administrative tool used to interact with the Mars Server Database. The tool allows for the searching and modification of Mars Users, the searching of Mars Modules, and is the only means of properly programming a new Mars Module. All of this functionality is password protected using the password set on the Mars Server.

Mars Attendance Tool

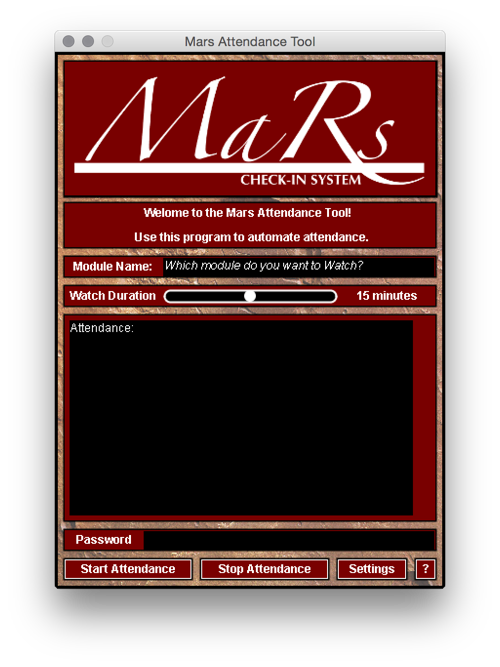
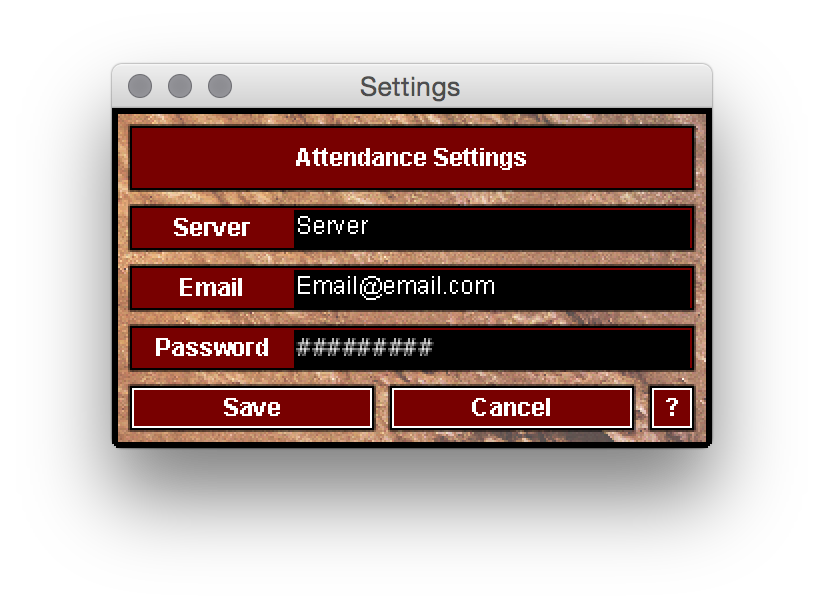
The Mars Attendance Tool is a single-window application that communicates with the Mars Server to take attendance on a specific Mars Module. By setting the duration and Module Name, an individual can use any Mars Module to take attendance. After the specified time has elapsed or the individual has stopped attendance, an email report is generated and can be sent to the email address specified in the "Settings" window. Here also is where the server Address is found. All server addresses, save the address programmed into the Mars Modules, can be in either IP form of a Domain Name.

Educational Minecraft

I have developed a body of technical resources using the game Minecraft. These "lessons" can be used to augment any introductory computer science curriculum. The full sight can be found at Minecraft.edu on the Physics Server.

0 comments

Elab Internship: Week 8 Day 2

Week Eight, Day Two

Tuesday, July 28th, 2015

Mars Check-In System

Daily Goals

Today I meet with administrators and staff members to begin the dialogue of continued development, support, and ownership of my system. I am excited to see the outcome. I also plan to debug the Server's botched Module Query Response and duplicate user query log history responses. I will also be talking to Dr. Wiecking about a couple of subjects concerning the end of my employment here at HPA. Also, I will continue to propagate the help pages as I near a more consistent design for the applications.

Daily Report

Several meetings were successful today. I was able to test cross-campus communication of the programs. They worked very well, responding quickly. I also tested how flexible the Modules were when put into an untested network. After programming them to properly interact with the local settings, they responded with the same fidelity and speed as a main-line module. With this first span test a success, I began a series of load testing of the server. Sadly, the response time to a module is consistently around 200-300 milliseconds. Plenty of time for a single query, but any kind of speed requirement is completely gone. I began testing its ability to handle requests from two different modules. The response fidelity (generating any kind of response) was less than 50% of the time. The servers ability to handle such traffic is highly inconsistent. This establishes this piece of software almost unusable for its intended purpose. Though relatively robust for single module use, the server has not demonstrated an ability to handle more than a single, infrequent query. I will have to conduct research into server creation and management. I hypothesize that a server cannot simply be an application run on a computer, but rather an integrated part of the computer, relying on the technical abilities of the machine to serve quickly and accurately.

Hours Report

Today: 11
Week: 22
Total :248

0 comments

Elab Internship: Week 8 Day 1

Week Eight, Day One

Monday, July 27th, 2015

Mars Check-In

Daily Goals

Today I start the debugging process of the server and all associated programs. Version 2.0.0 has been deployed, but is in dire need of some bug fixes. In addition to the technical work, I will be coordinating multiple meetings with staff to talk about the next steps, including implementation and continued development, of the Mars Check-In System.

Daily Report

I was successful in this first iteration of debugging of all three applications. In addition to some querying disparities between the server and the Remote Control, I have finalized the Attendance Tool's ability to email the attendance report to any email in the world.
I have scheduled meetings both with the School and some staff members to begin talking about project deployment and continued development. I am excited to see what the administration has to say about my project, and what the necessary avenues for use will be. Also, I am excited to see the current interface system between the Innate attendance system and the existing preparatory system. Having an understand of this interaction will allow me to craft the final step of the Attendance Tool.
In the vein of continued development, I need to devise a means of priority protocol. I will be talking with the administrators to see if there is any preference as to the action of this feature. Beyond that, the server continues to have difficulty querying for Module searchings. Narrowing the search parameters will be necessary for a refined response. Luckily, no errors occur as a result of the buggy very, simple a poorly crafted report.

Hours Report

Today: 11
Week: 11
Total: 237

0 comments

Elab Internship: Week 7 Day 3

Week Seven, Day Three

Thursday, July 23rd, 2015

Educational Minecraft Lessons

Daily Goals

Today I will begin work on the completing the third Educational Minecraft Lesson "Redstone: A Logical Pursuit." This requires the recording of a walkthrough video and the writing of an accompanying wiki. If I am effective today, It would be nice to build and record the fourth lesson as well "Redstone: Advanced Logic." Both of these lessons begin to introduce applicable technical content instead of simply learning to use the game environment.

Daily Report

I was successfully able to record the video for A Logical Pursuit and have begun creating its associated wiki. Also, I worked on the site in which all of this information will be presented, finally working out some of the bugs that did not allow the site to work. I also started some building on the following lesson "Advanced Logic" which features redstone contraptions such as flip-flop switches, memory, pulse modification, and clocks. I am excited to record this episode in the near future.

Hours Report

Today: 10
Week: 26
Total: 226

0 comments

Elab Internship: Week 7 Day 2

Week Seven, Day Two

Wednesday, July 22nd, 2015

Mars Check-In System

Daily Goals

Today I hope to fix the communication issues with the MAT. After that, I aim to fully adjust the server and begin a new development iteration of it to accommodate fully the newest additions to the Mars Check-In System.

Daily Report

The MAT is fully operational. I have also modified the server accordingly to accommodate the new methods of communication. After some streamlining, I am able to present the full Mars Check-In Suite v2.0.0. With this version of the system come a variety of improvements and additions. Some of those include:
  • Two way shared-key encryption for all communication between programs
  • Two-layer one way password encryption for password communication and response
  • The addition of an Attendance watcher which adds:
    • Real-time module watching
    • Timer-based watching that automatically ends after a specified duration (can also be canceled early)
    • Upon completion of a watch, generates a alphabetized report of all users detected during the watch period
    • Advanced watch communication abilities, allowing the report to be submitted via email
    • Saved communication settings
  • Streamlining of both the Mars Server and the Remote Control
  • Additions to the visual appeal of the program
  • Bug fixes
These major additions have improved the system considerably. I have deployed this version for testing in the Energy lab. The first overnight test demonstrates the same fidelity of previous systems even with the added security. Response time has not been affected.
Improving the query quality of the Remote control and the server's handling of multiple modules is the next step in the Mars System development.
Mars Suite 2.0.0
Now all that is missing is the M...

Hours Report

Today:8.5
Week: 16
Total: 216

0 comments

Elab Internship: Week 7 Day 1

Week Seven, Day One

Monday, July 20th, 2015

Mars Check-In System

Daily Goals

Today I will begin migration of the communication code for the Mars Attendance Tool from my personal library to the application. At the same time, I will be adjusting the code to suit the specific needs of the system. I will also start modification of the Mars Server to accommodate this additional mode of communication.

Daily Report

I have migrated all existing code to the MAT and have begun new development to streamline its communication with the server. I have also been simultaneously developing the server to enable testing and active troubleshooting. At current, the MAT communicates well with the server to initiate and stop a watch. The server not interacts with a new table in the .db file that will keep a list of all modules used to take attendance. That is a development issue that needs to be addressed, that is a module list table. I will consider this addition in the next development day of the server. The server reports swipe events from the specified module and reports them to the MAT during the timeframe specified by the MAT. To reduce server-side computational weight, The MAT keeps the counter of the attendance event and sends only a start/stop message to the server. If a start message is received and an attendance watch is started, the server will respond whenever are card is swiped into a specific module and report the event to the associated attendance IP. I have run into a problem of reporting however, for the MAT does not currently receive these events. I believe this problem is a result of conflicting sockets opened by the MAT using the same port, but further development and research is needed to confirm.
In addition to the communicate protocol, I have enabled all local housekeeping methods of the MAT. The communication server is now saved for continued use by the program as well as the communication email. These "settings" will be modified sometime next week when I begin integrating my system into the actual attendance processes of the school. I am excited for this next step.

Hours Report

Today: 7.5
Week: 7.5
Total 207.5

0 comments

Elab Internship: Week 6 Day 4

Week Six, Day Four

Friday, July 17th, 2015

Mars Check-In System

Daily Goals

Today I will introduce encryption into the Mars system. Also, I will clean up the GUIs of all programs and begin porting over the code of rate Mars Attendance Tool.

Daily Report

I was successfully able to introduce encryption to every aspect of the Mars System. The Arduinos with which the Mars Modules are made do not support an innate decrypt able encryption protocol. Therefore, I develop my own and standardized it across the modules and the accessory programs. The Mars Server now responds exclusively to encrypted communication from both the modules and the tools, as well as serves exclusively encrypted data. The Mars Remote Control and Mars Attendance Tool have also been outfitted with this common-key encryption. The next step in development of the security of this system is a centralized encryption key that is saved on the server. When each program or module first becomes active, the module queries the key from the server, using the previous encryption key, and installs the key at an appropriate time. I am excited at this added level of security, but will not be attempting it in the near future.
On the front of the Mars Attendance tool, I have begun developing the communication code. The tool will send a timer query to the server that begins a server-side timer. Th server responds to the tool during each check-in event, reducing the overall traffic of the system. once the timer has elapsed, the MAT responds appropriately. In addition to cleaning the GUI, I began developing this communication and the program-side operations. Next week I will complete the communication protocol and modifications of the server.

Hours Report

Today: 7.5
Week: 30.5
Total: 200

0 comments

elab Internship: Week 6 Day 3

Week Six, Day Three

Thursday, July 16th, 2015

Mars Check-In System

Daily Goals

Today I merge development of the attendance program I have been developing in my spare time with the Mars Project. At current, the Mars Module Watcher, or MMW, asks for an initial setup of the server the program will communicate with. After this is set up, the user can input a module name or IP to be watch and select a duration of watch. A password is required to begin watching the module. The program will then send a query every 5 seconds asking for a complete list of individuals detected by the specific module starting at the moment the watcher is turned on an ending the duration selected. The watcher automatically terminates the query after the watch duration has elapsed and asks if the user would like to keep a report of the watch. If yes is chosen, a text file containing information about the watch as well as a complete list of users found is placed onto the computers desktop. Here I am contemplating creating and Email option where the list is automatically emailed to a pre-defined address. The application as it stands requires excessive padding in order to be used by some of the less tech-savvy users. This is my primary goal for today. Also, and update to the server is necessary to react appropriately to this attendance tool.

Daily Report

I have successfully designed an GUI that streamlines the attendance process and removes, for the most part, the requirement of advanced technical knowledge. Rather than programming communication protocol every time (server name, email address, etc.), a settings window is available to program and save settings for continued use. This as well as a few modifications to the GUI present a relatively straight-forward attendance semi-automation through Mars. Following are screenshots of the GUI for both the Mars Attendance Tool, or MAT, and its associated Settings window.

Mars Attendance ToolSettings Window

The next step is migrating my communication and data handling code into this new GUI. Hopefully I can have the first version of the tool working by the end of the day tomorrow for testing in the coming week.

Hours Report

Today: 8
Week: 23
Total 192.5

0 comments

Elab Internship: Week 6 Day 2

Week Six, Day Two

Wednesday, July 15th, 2015

Educational Minecraft Lessons

Daily Goals

Today I will finish writing the Wiki for Redstone Electrifying Minecraft and build Redstone: A Logical Pursuit. Hopefully I can develop the lesson so that I might record tomorrow and start work on the lesson after that. These first two lessons are the big ones, being much more tutorial/walkthrough inclusive than later videos.

Daily Report

I was successfully able to create the wiki for Redstone: Electrifying Minecraft and have begun work on build A Logical Pursuit. However, I ran into some compatibility issues when recording the Redstone: Electrifying Minecraft Lesson. The computer I am using has a retina display. Screen recording on this device are absolutely gigantic because of the resolution. Therefore I had to re-record the lesson using the 2011 MacBooks to keep the recording size down so the server could manage it. An unnecessary waste of a couple of hours, but I have noted this for future reference.

Hours Report

Today: 8
Week: 15
Total: 184.5

0 comments

Elab Internship: Week 6 Day 1

Week Six, Day One

Monday, July 13th, 2015

Mars Check-In System

Daily Goals

Today I will assemble two complete Mars Modules, programming them for use at the HPA gate and the Robotics Classroom.

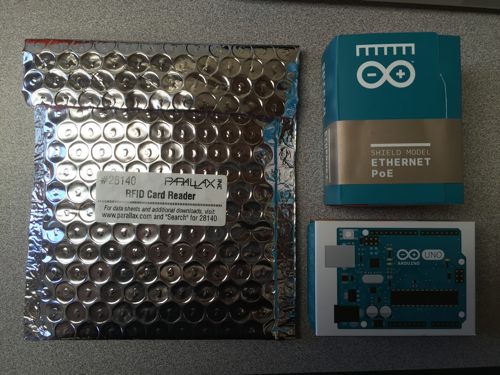
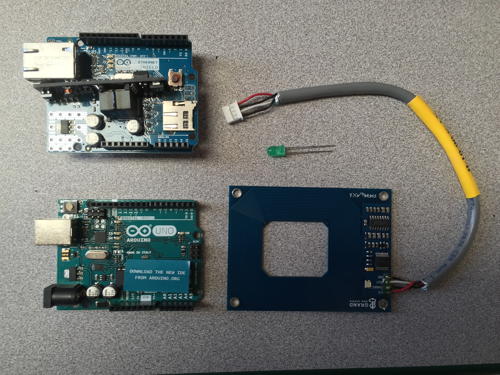
Each module consists of six components: an Arduino Uno, and Arduino PoE Ethernet Shield, a Parallax RFID Reader, an LED, a 4x7.5x2.5 inch styrene enclosure, and a gigabit Cat5e Network Cable. These components are assembled and modified apropriately to produce the complete Mars Module.

Daily Report

I have successfully built and programmed two Mars Modules for use at the Tennis Gate (called TennisGate) and in the Robotics Classroom (called Robotics). Following is a visual walkthrough of the assembly process with descriptions.

Module Components still in the Box
Components in Boxes


Module Components out of the Box
Module Components


Top Left: Arduino PoE Ethernet Shield
Bottom Left: Arduino Uno SBC
Right: PArallax RFID Reader
Middle Right: A Green LED
Not Shown: Cat5e Ethernet Cable, Styrene Enclosure

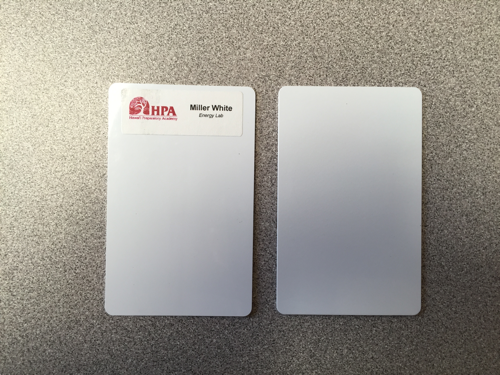
An RFID Card Front and Back
RFID Card


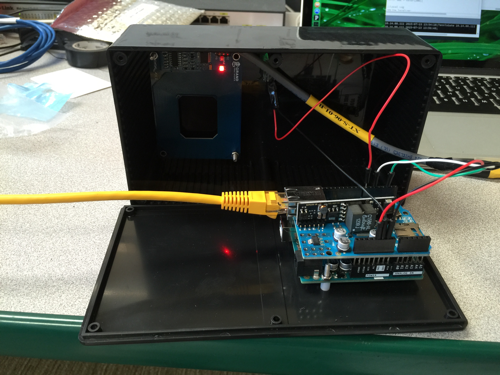
An Open Mars Module
Open Mars Module


The module in this state is ready to be programmed via a USB cable connected to a computer running the Mars Remote Control. At current, this module has its Cat5e Cable plugged in instead and is ready to be closed.

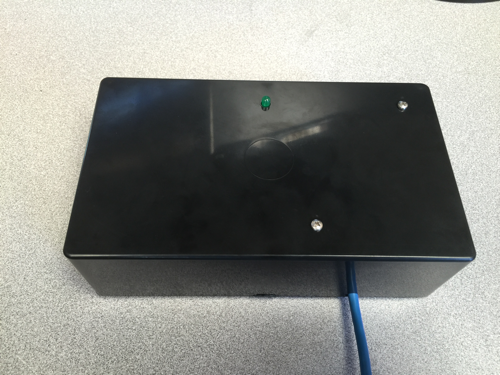
Complete Mars Module
Complete module


Though not particularly flashy, this device allows for incredibly population surveying. Each module communicates to the Mars Server of your choosing to compile data collected by the components inside.

As for today, I was able to complete two of these modules, called TennisGate and Robotics. These modules are ready for use anywhere within the local network of the school. These modules can be used anywhere in the world though if programmed to communicate through the WAN with a Domain name or a WAN IP routed to a Mars Server.
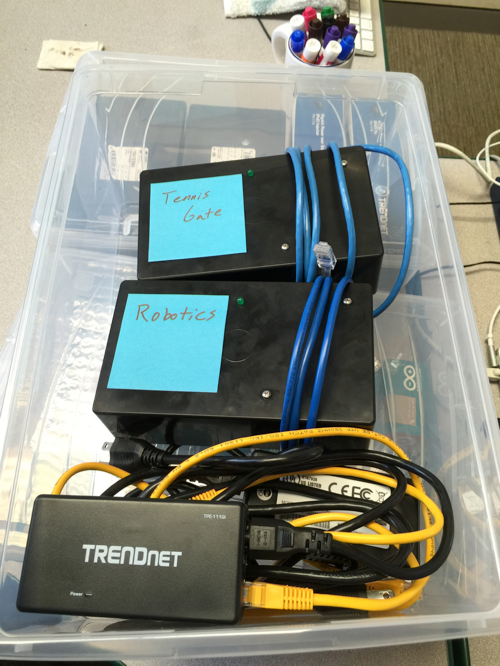
Todays Work


The cords at the bottom are the 48V PoE injector and its associated cords. This is the hardware necessary to power and Mars Module and allow it to access the network.

Tomorrow will be spent modifying the Server Program to accommodate the new Attendance Program I have been working on. Also, I need to continue work on the EML Curriculum. Hopefully I can complete two additional lessons by the end of this week.

Hours Report

Today: 7
Week: 7
Total: 173.5

0 comments

EML Minecraft: Electrifying Minecraft

Electrifying Minecraft

Educational Minecraft Lesson


The Lesson Video Library
The Classroom Page

The World Download Page

Lesson Introduction

Today you will learn the basics of redstone, the electricity analog in Minecraft. Redstone behaves in reference to certain rules that are predictable and manipulable, just like in real life. The realm of redstone mechanics is nearly endless, and today you will gain familiarity with some of the fundamental processes of redstone: Signals, transmission, repeating, and component use.

What can Redstone do?

Redstone can perform any number of tasks, from simply turning on a light in reference to a lever to recreating RAM and full pixel displays. The difference between these two projects is that of their complexity, not their component use. Whether you are wiring your house of playing a game of snake, Redstone depends on some fundamental concepts and blocks to work. With time, you will gain command of these concepts and be well on your way to creating unique and elegant Redstone machines. I use the term elegant to describe your future builds because, as will all computing systems, there is an "elegant" solution and a "working" solution. In later episodes, we will focus on the necessity of finding efficient, speedy, and applicable solutions to your particular Redstone desires. Keep this idea in mind as you start to explore Redstone circuitry.

Signal Distance

One of the most important attributes of Redstone is Signal Distance, which refers to the number of blocks a single Redstone input can travel before fading. From the power source, a Redstone wire can be laid without interruption 15 blocks in a row before the signal on the end no longer exists. As the signal travels farther from the power source, its bright red "on" color starts to darken. By the 15th block, the shade of "on" Redstone is very similar to "off" and can be identified mostly by the smoke coming off of the wire. Don't worry, the smoke is a positive thing. It is another indicator that that particular Redstone wire is powered.
In the EML World, I have constructed a series of lights to demonstrate this concept. Each light within 15 blocks of the power source can be seen to turn on when the lever is flipped whereas the final light at the end of the string does not. This concept is directly applicable to the real world, for cables like Ethernet can only be a certain length (roughly 328 feet) long before losing their signal.

Vertical Translation

Laying Redstone horizontally is easy enough, only requiring that a block be beneath. Vertical translation of Redstone is a little more involved, requiring the use of a "Redstone Ladder." A ladder is the blanket name given to any block pattern that allows a Redstone signal to move up or down a layer of blocks. In this lesson, I will present four kinds of Redstone Ladder: The Stair, Glowstone, Ascending Torch, and Descending Torch Ladders.

The Stair Ladder

The Stair Ladder is the most common ladder in Redstone. Consisting of a series of diagonal blocks, the Stair ladder is able to transmit signal both up and down quickly. The only downside to the Stair ladder is the space efficiency. At a minimum, the Stair ladder requires four blocks of horizontal space, significantly more than some of the other ladders. Its simplicity and flexibility are king though, making it the most important ladder of these four.

The Glowstone Ladder

The Glowstone Ladder represents the fastest means of transmitting a redstone signal upwards. Comprised of a two-wide checkerboard pattern of Glowstone, this ladder can transmit a signal instantly as many as 14 blocks vertically. However, the Glowstone ladder can only be used to transmit Redstone signal upwards. The ladder occupy only 2 blocks of horizontal space, making it the second most space efficient upwards ladder.

The Ascending Torch Ladder

The Ascending Torch Ladder represents the most space efficient ladder of the four. Occupying only a single horizontal block, this ladder consists of a stacked pattern of Block, Redstone Torch, Block, Torch, and so on. However, because of the way Redstone torches interact, the details of which we will get into in the next lesson, this ladder is relatively slow, introducing a 1/5th of a second delay for every redstone torch in the tower. Also, this ladder will only produce a corresponding signal (on=on or off=off) every other step of the ladder. Therefore, some additional redstone manipulation is required to fully utilize this particular ladder. If space efficiency is the concern however, the Ascending Torch Ladder is the ladder of choice.

The Descending Torch Ladder

The descending Torch Ladder represents the most space efficient means of transmitting a redstone signal downwards. Occupying only two horizontal blocks, the ladder consists of a repeating pattern of Block, Redstone dust, and Redstone torch (see below) to transmit signal downwards. Seeing as this is a torch ladder, the same attributes as the Ascending Torch Ladder apply, i.e. slow signal transmission and an offset corresponding signal. Besides the Stair Ladder, the Descending Torch Ladder represents the only other means of transmitting a signal downwards.

The Redstone Repeater

The Redstone Repeater is a very powerful block readily available in the game. With the addition of some quicks, the Redstone Repeater performs three primary tasks: signal extension (repeating), programmable signal delay, and controlling the flow of signal (as a Diode).

Repeating a Signal

Most Redstone projects require that you transmit a redstone signal farther than 15 blocks. A redstone signal is extended by a block called a Redstone Repeater. This flat block is placed at any point in an energized redstone wire to repeat the signal and begin a new count of 15 blocks. This is particularly useful if you have built a glowstone or stair ladder that needs to go higher than 15 blocks.

Programmable Delay

Another powerful function of the redone repeater is its ability to introduce a programmable delay into any circuit. The standard time unit of minecraft is one "tick" or about 1/5th of a second. When a repeater is initially placed, it has an innate delay of one tick. By right clicking the repeater, the rear torch can be seen moving away from the front torch. This is the visual representation of adding a tick to the delay. Right clicking a single time will program the repeater with two ticks. Two clicks will program a three tick delay, and so on until you have right clicked three times, programming the repeater with its maximum delay of four ticks. Right clicking the repeater again will start the count over at the innate value of a one tick delay. Placing multiple repeaters in a row is additive, allowing you to program any number of delay greater than a single tick. The delay also applies to how quickly the signal is turned off. For every tick that is programmed into a circuit, the signal will be delayed both turning on and turning off by that value.

Governing Signal Direction

The final function of the Redstone repeater is its ability to control the flow of Redstone signal. Upon examination of the redstone repeater block, a faint, very pixelated triangle can be seen with its point at the stationary torch. This arrow describes the direction a redstone signal is allowed to flow through the repeater. You can predict the direction a repeater will face, for the arrow will point in the same direction you (the player) are facing. If you are looking in the direction of the sun and place a repeater, the repeater will point towards the sun. Placing a repeater backwards shuts off any strength of redstone current. This function most closely mimics that of a diode.

Conductors and Insulators

As in the real world, blocks in minecraft can be divided into Conductors and Insulators.

Conductors

Conductors make up most of the blocks available in Minecraft. The stone pathway you are walking on in the world or the wood that the spawn is made out of are two examples of conductors. Conductors allow a redstone signal to pass through them, acting as a one block long redstone wire. This is particularly useful if you want to hide a power source (like an outlet!).

Insulators

Insulators have three special qualities that separate them from conductors. Insulators do not allow redstone signal to pass through them. If placed in the same way as a conductor, the insulator will stop a redstone signal as if there is no connection.
Insulators will also not interfere with a connected redstone circuit. In the example in the lesson, a piece of glass (one of the most common insulators) is observed allowing a redstone signal to ascend uninhibited. If a conductor was placed in the same location, the redstone wire would be cut and no signal would be allowed to pass through. This is particularly useful for circuit protection and hiding.
Finally, insulators are not receptive of redstone components. Redstone dust, redstone repeaters, levers, buttons, and pressure plates cannot be placed onto insulators. There is only one instance where this is not true and that is...

Glowstone

Glowstone is the only insulator that will receive a redstone component. As demonstrated by the redstone ladder, Glowstone will allow redstone dust to be placed on top of it. This, paired with its non-conductivity and that it does not cut redstone wire are what make glowstone so useful in redstone projects. The details of all blocks including glowstone, are available on the Official Minecraft Wiki. I encourage you to experiment with as many blocks as you can to determine their conductivity.

Redstone Components

In addition to redstone dust and repeaters, there are myriad blocks that specifically require redstone interaction.

Input Devices

Input devices allow the player to interact with a redstone circuit. You have already experienced buttons, levers, and pressure plates. Buttons and pressure plates come in either wood or stone (the difference is the delay they stay on). In addition to these, there is the tripwire. A tripwire is placed one block above the floor and strung with string to create a "wire" that the player can walk over to activate. This is particularly useful in mini-games and user-dependent machines because they can completely cover a particular path.

Daylight Sensor

Another input device that does not depend on the player is a daylight sensor. This sensor will detect the ambient light level of a location and output a redstone signal of corresponding strength. This will be particularly applicable much later in the series when we begin to model sustainable processes in reference to the sun.

Pistons

There are two type of kinetic block manipulators. The Piston and the Sticky Piston allow you to move a stack of blocks one position in reference to a redstone signal. The sticky piston will retract the block touching the piston head when not power whereas the normal piston only pushes. The maximum number of blocks a piston can move is twelve. However, there are some immovable blocks such as obsidian and furnaces that a piston will have no effect on.

The Redstone Lamp

The Redstone Lamp functions exactly as you would think. In reference to a redstone signal, the lamp will turn on and off, producing light. By another quirk, a powered redstone lamp will also power all of the blocks touching its faces, creating a star pattern if the center block is powered. The specific light levels produced as well as its other attributes can be found on the Official Minecraft wiki.

The Note Block

The Note block is a programmable block that will produce a single beat at the specified pitch when powered by a redstone signal.

Dispensers, Droppers, and Hoppers

Dispensers, Droppers, and Hoppers all deal in the transportation of "drops" or the transitory state of all blocks between placement and your inventory. When powered, a dispenser will expel whatever block is placed inside of it (use right click to open its inventory). If the object inside of the dispenser can be fired, it will do this rather than spitting out the drop. This applies to arrows, snowballs, and fireballs. The dropper functions similarly to the dispenser, but will only ever expel the drop form of the block. The hopper allows drops to move between hoppers, droppers, chests, and furnaces by sucking the drop in through the top and spitting it out of the bottom tube. The specifics of how to place hoppers and properly connect them are available on the Minecraft Wiki. We will be dealing later with some special features of Hoppers.

Power Source Blocks

Power source blocks are the only blocks in the game besides user input components that provide a redstone signal.

Redstone Torch

The Redstone torch provides a constant output signal of 15 (signal strength 15) that can be turned off and on by powering the block it is placed on. This function becomes particularly important in later episodes.

Redstone Block

The Redstone Block is a solid block of redstone that provides a constant signal of 15. The block cannot be turned off and powers all surrounding blocks as well. This is the only redstone component that can be moved by a piston.

The Comparator

The final redstone component is the comparator. This little device is immensely powerful performing multiple computational and detection tasks.

The Block

The comparator is a block that looks very similar to the redstone repeater. When placed, the comparator will face in the same direction you are. On the top of the flat block are three redstone torches at each of the vertices of the triangle. These three torches describe the various sides of the redstone comparator. The first side, called the "A" side is the face parallel with the two bottom torches. The "B" sides are to either side of those torches. The "C" side is parallel to the face with the single torch. This side is the output of the compared signal. A and B are inputs. The Minecraft Wiki goes into more detail on these sides and their function. I also walk through the use of Redstone Comparators in the third video of this lesson.

Comparison Mode

The first function of the Comparator is its namesake ability: comparing two signals. When inputing a signal into the A side, it is compared with a signal detected by the B side. If A > B, the A signal will be allowed to pass through. If A < or = B, the signal will be stopped. When a signal passes through a comparator, a one tick delay will be introduced and an output signal of strength equal to the A input strength.

Subtraction Mode

Subtraction mode performs a particularly complicated comparison between the A and B inputs. To change the comparator into subtraction mode, simply right click it. The front single torch will turn on telling you that the comparator is now in subtraction mode. In this instance, the comparator will perform the operation A - B = C, outputting a signal of strength A - B.

Detection

The comparator is used to detect an attribute of a block. Most commonly applied to chests, droppers, and dispensers, the comparator will output the a signal strength of the number of slots filled within each block. If one row of a single chest is filled with blocks, the comparator will output a single of 5, or 1/3rd of 15. The Official Minecraft Wiki goes into much more detail about the intricacies of the comparator. I also walk through all of these functions in the 3rd video as I mentioned before.

What You Have Learned

Today you were introduced into he fundamentals of Redstone, the Minecraft analog of electricity. You approached the idea of elegant and working solutions and observed a few examples of Redstone circuitry. You saw that a Redstone signal can only travel 15 blocks at a time before being repeated, and in order to transmit that signal up or down, you must use one of four ladders. You learned that repeaters can extend a signal, introduce a programmable delay, and act as diodes in a redstone circuit. You experimented with Conductors and Insulators, exploring the specific attributes of both and discovering the unique properties of Glowstone. You met all of the members of the Redstone component family, including tripwire, pistons, and dispensers as well as approached the concept of a power source block. Finally, you explored the power of the Redstone Comparator, using it to Compare, Subtract, and Detect various signals and blocks. All of that information is now at your command, for you are fully equipped to start developing your very own redstone projects. In the next few lessons, I will explore some more redstone circuits that will really take your redstone building to the next level. But, until then...

Build on.
Prof. Molitor

0 comments

Elab Internship: Week 5 Day 4

Week Five, Day Four

Thursday, July 2nd, 2015

Educational Minecraft Lesson

Daily Goals

Today I plan to record the second lesson walkthrough and write its corresponding wiki. Once those are done, I will load them onto the server. If that is completed, I will start building the third lesson "Redstone: A Logical Pursuit" and brainstorming page ideas for the server.

Daily Report

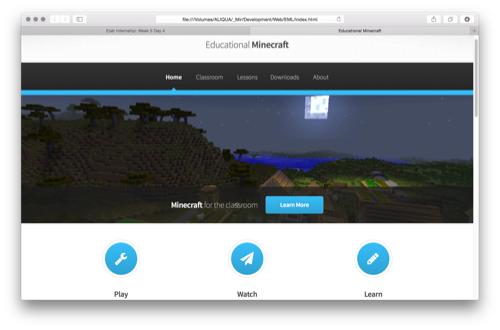
I was successfully able to record the walkthrough and have started writing the wiki. The bulk of todays efforts were focused on the production of an appropriate web resource for the wiki and videos. I have started modifying an HTML5 template to suit the unique needs of the EML system. I am very excited about the finished product of the website, for it will offer complete access to all EML resources on the web.

Here is the development of the website so far.

EML Home Page

Hours Report

Today: 6
Week: 33
Total: 166.5

0 comments

Elab Internship: Week 5 Day 3

Week Five, Day Three

Mars Check-In System

Daily Goals

Today I will rework the physical modifications to the module, reverting it back to its original, simple self. I will also tackle the WAN communication protocol that allows querying to the server beyond the confines of the local network. All associated software modifications will be done today as well to complete this development. My final goal is to deploy a "working" system of server and module by the end of the day.

Daily Report

I was very successful today with both the modification of the module and the establishment of the WAN communication protocol. The Module now responds to an affirmative tag with a single long led blink. A denied tag receives a flurry of five fast blinks. When the module is restarted, the LED blinks twice fast to indicate it is ready for operation.
On the software side, I discovered that my previous use of the Ethernet Shield was incomplete. Though operational, the arduino was not able to communicate with the router for the building, and therefore stuck to communicate with machines on this side of the switch. To remedy this, I introduced three new programmable attributes to the module: Router IP, Subnet Mask, and DNS. These three additional communication protocols allow the arduino to communicate with any machine in the world, gently extending its applicability. However, these three changes have affected every program in the Mars arsenal so far, necessitating a change to the MRC and the Server. However, after much fiddling, I was able to synchronize all systems. I successfully released Mars Server version 1.0.4 with this addition and have returned the module to its original place.
The order was placed for additional materials to begin constructing more Modules. The next steps in development is to test the server with multiple modules interacting at the same time. The system is fast, but I am concerned with its ability to handle multiple queries in quick succession. Steven has helped me develop a switchboard idea that may be the next installment to the Mars family. We will see when the parts arrive. The attendance application has been tables for later development.
Tomorrow I will switch gears and record the video tutorial for Redstone: Electrifying Minecraft as well as create its corresponding wiki. Dr. Bill has given me access to the physics server and administrative privileges over a Minecraft-edu folder. It is there I plan to host the videos as well as the wiki entries and world downloads for the EML Curriculum.

Hours Report

Today: 8
Week: 27
Total: 160.5

0 comments

Elab internship: Week 5 Day 2

Week Five, Day Two

Tuesday, June 30th, 2015

Mars Check-In System

Daily Goals

Today I will work on establishing a home-base for the Mars Server. Previously I have been running it off of one of the laptops, but with the constant sleeping and restarting of the small device, the server is often inoperable until I restart it manually. Dr. Wiecking given me space on one of the larger machines for the server. I plan to set that up today with extensive testing. Also, I will research multi-thread handling for implementation in the Mars Server Program. Finally, I am compiling a list of parts for the construction of additional modules.

Daily Report

Progress was slow today. The majority of time was spent trying to identify a compilation error that processing spits out when introduced to a new OS. This was remedied by exporting the application in the same version of Mac OS that it is intended to be used on. I ran intro further trouble after exportation because processing does not export hidden files and folders. After replacing some key folders, The application finally started up. I will be running it on slab-conference-east at 10.14.4.141 or wordpress.hpa.edu.
I also modified the Mars Module to accommodate an LCD screen. I reprogrammed the board and it now responds to the module with the name of the user. This is a highly tasking upgrade, however, for the physical space inside the enclosure is limited. Also, the RFID reader once again overheated with the excessive compilation and on-off cycling during development. I plan to let it rest, or stick it in the fridge.
Tomorrow will be spent sorting out the communication protocol between a module and a server not directly linked to the server device.

I joined the robotics class briefly today. A good group of kids. I look forward to working with them.

Hours Report

Today: 10
Week: 19
Total: 152.5

0 comments

Elab Internship: Week 5 Day 1

Week Five, Day One

Monday, June 29th, 2015

Educational Minecraft

Daily Goals

Today I begin building the second lesson, Redstone: Electrifying Minecraft. This lesson will be focussed on the basics of redstone to establish a foundation for following redstone lessons. I plan to build a less extensive, but equally informative block that contains redstone signal transmission, repeating, and the block and components associated with mine craft. I will record the walkthrough lesson sometime in the next few days as well as propagate the wiki.

Daily Report

I was successfully able to create and edit the Electrifying Minecraft lesson. I have gone through and streamlined the prompts and am ready to record the walkthrough videos.

Robotics Class

Daily Goals

The Robotics summer session begins tomorrow. I am excited to present a completed Arduino Controller application to Steven later today. However, I first need to streamline the GUI of the controller, create the active key-watching, and program the buttons to specific serial outputs.

Daily Report

I have finished the visual and technical design of the controller. I exported the application in preparation to present to Steven. However, there is some disparity between versions of the OS or something deeper that affect the processing based exports. As a result, the exported application is very finicking and barely works on devices other than the one it was compiled on. I will research this problem.

Hours Report

Today: 9
Week: 9
Total: 142.5


0 comments

EML Minecraft: Learning the Ropes

Learning the Ropes

Educational Minecraft Lesson


The Lesson Video Library
The Classroom Page

Welcome to Minecraft!

Minecraft is an open source, sandbox computer game that allows you to build, destroy, and interact with the every aspect of the environment. In this lesson, you will learn how to move around and interact with the various blocks and devices within the game, gain a preliminary understand of what kinds of blocks exist in the game and how they are used, and meet the various other non-player entities that share this cubic world with you. This lesson is structured on the assumption that you have successfully downloaded the game and either the EML Full World or Learning the Ropes Lesson World. Both of those downloads are available here (link pending).

Starting the Game

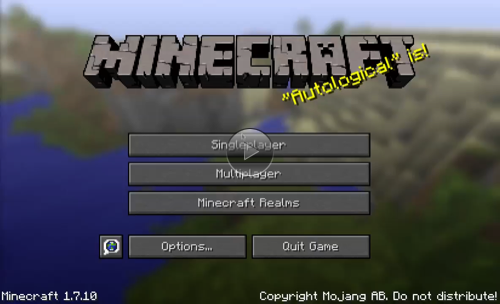
When you first start Minecraft and log in, you encounter the start-up window with options of "Single Player", "Multiplayer", and "Minecraft Realms" as well as "Options" and "Quit Game". To begin playing, left click the "Singleplayer" tab. This brings you to the world selection. Select the world you wish to play (Either the "EML Full World" or "Learning The Ropes" lesson world) and click "Play Selected World". You will then spawn into the world, starting initially at Spawn.

Spawn

Spawn is the location to which you can always return after or during a lesson by selecting the "Return to Spawn" buttons throughout the full world. If you are playing on a Lesson World, The spawn area will simply be the entrance to the lesson. In the full world, Spawn is located inside a build with a large floating arrow above it that says "SPAWN". Inside Spawn are all of the lesson selections (again, only in the Full World) as well as the welcome signs and the basic instructions. Use this area to navigate to any lesson on the map.

First Login

During your first login, a prompt will appear in the bottom left of your screen with some basic instructions. Those instructions give you information about movement in Minecraft and welcome you to the world. To move, use the 'W' 'A' 'S' and 'D' keys to move forwards, left, backwards, and right, respectively. Moving your view area is accomplished by moving your mouse. To view a prompt that has disappear, press 'T'. This displays all prompt history. To exit from the prompt history, press the escape button.

Interacting with the Lesson Hub

All of the lessons are accessible through the Spawn via transportation kiosks. Each kiosk has a sign stating which lesson it is linked to and a button. Use right click to press the button. This will teleport you to the specified lesson. For this lesson, use the kiosk labeled "Minecraft: Learning the Ropes". If you mistakenly transport to a lesson, use the "Return to Spawn" buttons on the entrance gate. These will teleport you back to the Spawn building.


The Keyboard

Once you have teleported to "Learning the Ropes", the first prompt you encounter is the Keyboard tutorial. You have already learned that 'WASD' allow you to walk around and that 'T' brings up you prompt history.

Inventory

In addition, pressing 'E' will open your inventory. In creative mode, the default mode of the world, pressing 'E' will bring up a complete inventory of every block present in Minecraft. The various tabs on the top and bottom of the window navigate through the various types of blocks. The top right-most tab is a search tab, allowing you to type in the name of a block without having to sift through the other tabs.
To select a block from this inventory, left click it. This will pick up the block and attach it to your cursor. To drop a block, simply left click again. If you have dropped the block into an empty inventory slot, such as your hot bar or player inventory, the block will be placed into that space. To pick up a whole stack of materials, hold down shift and right click the material. left clicking while holding shift will send the block to the nearest open space in the next inventory window. Selecting the bottom right-most tab of the creative inventory window will take you to your player inventory. This area is carried with the player like a backpack and is accessible at all times in both creative and survival modes. The bottom line of nine boxes is called the hot bar. This is your "heads-up" inventory area that also appears on your screen when not viewing your inventory. The hot bar is navigable outside of the inventory window by either scrolling the mouse wheel or pressing numbers 1-9 on your keyboard. To exit all inventories, press escape or 'E'.

More Movement

'WASD' control horizontal motion at one speed. To jump, press spacebar. To print, press 'W' quickly twice, holding down the second press. In creative mode, you are able to fly. This is accomplished by pressing space twice quickly. While flying, hold spacebar to ascend and shift to descend. You automatically stop flying when you touch back down to the ground. Holding shift while walking will initiate "Sneak Mode", where you cannot fall off of an edge. Your point of view also changes slightly when in sneak mode, sinking just a small amount. The section following the keyboard prompt allows you to experiment with the various movement controls.

Block Use

After you have mastered movement within Minecraft, the next step is block interaction. You already know how to select blocks from your inventory and drag them to your hot bar. When a block is selected in your hot bar by scrolling or pressing 1-9, the block will appear in the bottom right of the screen where your hand used to be. This means the block is ready to be used. To destroy a block, left click once it is highlighted. You can tell a block is highlighted by a thin black boarder around the edges of the cube. To place a block, right click with the block in your hand. This will place the block on the highlighted surface. If there is nothing in your hand or no block is highlighted, right click will do nothing. Left click also serve to hit things.

Gravity

Most blocks in Minecraft do not obey gravity, being able to float without any structural attachment to the ground. Others however, including you the player, will fall when nothing is beneath you. Two types of gravity blocks are lava and water. Both can be poured from a bucket. Right click to pour the lava or water onto the selected surface. If you have an empty bucket, right clicking a source block of water or lava will cil the bucket. More information on the mechanics of Lava and Water is available on the Official Minecraft Wiki. There are two other blocks that obey gravity that are not liquids. Gravel and Sand exist as single blocks, but when places will fall until them are stopped by another block. These blocks are placed and destroyed in the same way as other blocks.


Hunger, Plants, and Farming

Hunger, Plants, and Farming are essential processes for a complete Minecraft experience. Though Hunger is not experienced in creative mode, growing plants or farming animals is applicable to a wide variety of machines and systems that can be built in either mode.

Hunger

Hunger does not affect players in creative mode. In survival mode, you will gradually become hungry as you participate in various survival activities. To eat, select an edible item (such as steak, apples, or zombie flesh) in your hot bar and hold down right click. You will continue to eat until you are satiated. Some foods sun as Zombie Flesh and Raw Chicken will give you for poisoning when eaten. The Official Minecraft Wiki goes into more detail about food and its effect on the player.

Plants

Plants grow in abundance in the Minecraft world. All plants are spawned only once in the creation of the world, however, and do not grow back naturally. Therefore, you the player are obligated to replant and maintain a sustainable Minecraft Ecosystem. Planting saplings, flowers, and grasses is accomplished by right clicking on a patch of open ground. Some plants, such as Cacti and Sugar Cane can only be planted on specific kinds of ground (sand). Tree saplings will eventually grow into full sized trees ranging from 6 to 30 blocks in height. Plants have many functions, from eating, gaining materials, and generating scenery. The Official Minecraft Wiki goes into more detail about plants, their growth, and the processes of use.

Farming

Plant farming is the primary means of acquiring food in survival mode. To plant a seed, you must first till a dirt block. This is accomplished by right clicking the ground with a hoe. If you wish to give the plant an optimal growth environment, water within a solid four block horizontal radius or directly beneath the tilled dirt will hydrate the soil. Any of the plants (Melons, Pumpkins, Wheat, Potatoes, and Carrots) will grow gradually through seven stages, eventually maturing into a harvestable adult. This process takes approximately 20 minutes. The Official Minecraft Wiki goes into more detail about plants, their growing, and farming techniques.


Tools and Weapons

Tools and Weapons are primarily useful in survival mode. However, some actions such as tiling soil, scooping water, or killing mobs efficiently are only accomplished with the help of a tool.

Tools

There are four kinds of primary tools: Pickaxes, Wood Axes, Shovels, and Hoes available in five different durabilities: Wood, Stone, Gold, Iron, and Diamond. Each tool is uniquely suited for its intended task (i.e. Wood Axes cut down trees better than Shovels) and the material it is made out of improves its lifespan and its efficacy. There are additional tools that do not come in varying types. Some of those tools are Fishing Rods, Buckets, Shears, Flint and Steal, Compasses, and Clocks.

Weapons

There are only two kinds of true weapons: Bow and Arrows and Swords. However, all tools and blocks can be used to hit things. Weapons deliver a much larger amount of damage than, say, a piece of steak.
To use a Bow and Arrow, both items must be present in your inventory. With the bow in your hand, hold down right click to pull back. The longer you hold down right click, the strong the shot will be, until you reach a full pull. To release the arrow, stop pressing right click. Aiming is accomplished by moving your mouse. If there are no more arrows left in your inventory, you cannot fire. The Official Minecraft Wiki goes into more detail about the distance and mechanics of arrow flight.
Swords are the primary melee weapon of the game and can be made out of one of the five before-mentioned materials. With each material, the innate amount of damage the sword deals out goes up. To swing the sword, left click. To block with the sword, hold down right click. Blocking will reduce any kind of entity-dealt damage such a bites or arrows. Blocking with a sword will not protect you from gal damage or explosions.


Building Materials

Minecraft is at its heart a building game. There are hundreds of different kinds of building materials available to you, all of which are readily accessible in your creative inventory. In survival, you must find and harvest a material to use it.

Ores

Ores and their associated minerals are the building blocks of most mine craft functions. The naturally occurring ores are Gold, Iron, Diamond, Emerald, Redstone, and Lapis Lazuli. For the purposes of building tools and weapons, stone and wood can also be considered ores. Each or when mined produces a drop of either the ore-block itself or an intermediate stage. If an ore block is dropped (such as in Gold and Iron), the block must be smelted to achieve the intermediate state (Gold and Iron Ingots). The other ores automatically drop their intermediate stage. These intermediate blocks can then be used in a multitude of functions or to create solid building blocks of that specific material, as displayed in the lesson.

Wool

Wool is the most diverse building material. It comes in 16 unique colors ranging from total Black to Magenta. Different colored wools are readily available in the creative inventory, but in survival must be dyed either on the sheep or in a crafting table. The Official Minecraft Wiki goes into more detail about the various dyes and their application in wool and other materials.

Wood

Wood is the most accessible of the building materials. Produced by trees, wood can be mined with any tool, including that piece of steak. when first mined, wood will produce a single log of that specific tree. This log can be converted into myriad types of other resources such as wooden planks, doors, and stairs. All wood items can also be burned in a furnace, but are not the most efficient kind of fuel.


Functional Blocks

Functional Blocks allow you to "make" something with a process otherwise unavailable in the game.

Crafting Table

The Crafting Table is the most important block in all of Minecraft. Within its 9-block interface, every other block in the game can be created from a select few basic blocks. For example, dropping a wood log into the crafting window will produce 4 blocks of wooden planks. 6 wooden planks arranged in a certain way within the crafting window will produce 3 wooden doors. The Official Minecraft Wiki contains a complete list of crafting operations, but I highly encourage experimentation on you own before simply "looking it up".

Furnace

The Furnace does what you might expect. Ultimately an oven, the Furnace can cook all kinds of materials, ranging from succulent pork rinds to solid stone and iron. To cook/smelt any item, place the item to be cooked/smelted in the top square and the fuel in the bottom. The most efficient fuel in Minecraft is a bucket of lava, but a block of coal or a single piece of coal are preferred. Other items like logs, fence, and sticks will ask burn, but a significantly shorter time than the previously mentioned fuels. Furnaces are used to convert Iron and Gold ore to their intermediate states.

Enchanting Table

The enchanting table allows you to "Enchant" a tool, weapon, or piece of armor to improve its function. In creative, this is not entirely useful. However in survival, some attributes such as blast protection or efficiency ill greatly improve your survival experience. Enchanting uses experience as currency to enchant at various levels. The level cap is 30. The Official Minecraft Wiki has a complete list of the available enchainments as well as their various attributes and to what they can be applied.

Anvil

An anvil allows you to combine two or more like tools, weapons, or pieces of armor. This combinate will add their durability (causing the final product to last longer), and any enchantments that either tool might have. You are also able to give the specific tool a name. Anvils use experience as currency to conduct their various repairs and combinations. Anvils do gradually degrade even in creative mode and will need to be replaced every so often.

Brewing Stand

The Brewing Stand is the least applicable to the purpose of this lesson. Brewing stands allow you to create potion that will give you the player certain special qualities for a finite amount of time. The Official Minecraft Wiki goes into extensive detail about the process of brewing, but for the purposes of this lesson, it is not essential to know. Players in survival mode will greatly benefit from brewing.


Mobs

The Minecraft world is not a lonely place, serving as host to multiple kinds of animals, entities, and non-player characters, all of which can be interacted with for the benefit of the player.

Animals

Minecraft contains many kinds of animals. The farm animals include pigs, sheep, cows, horses and chickens. All of these animals provide some kind of material, either meat, wool, eggs, or milk, that are not accessible anywhere else in the game (other than the creative inventory). Dogs and Cats are the domesticated versions of Ocelots and Wolves, requiring attention from the player to survive.
WARNING: These animals cannot respawn naturally. Much like the rest of the environment, it is up to the player to maintain a healthy Minecraft ecosystem. Breeding is a critical practice in both survival and creative mode, though spawn eggs are available in the creative inventory. We will experiment with farming later in this curriculum, but the Official Minecraft Wiki goes into extensive details on the growth, maintenance, and harvest of all these animals.
Other animals such a squid and bats are not tamable nor particularly beneficial. Squids will produce ink, the base of black-dyed wool, but are otherwise not useful. Bats do not drop anything. However, both are incredibly pleasant creatures worthy of your respect and care.

Hostile Mobs

There are multiple other entities in Minecraft that are dead-set on seeing you dead. Thes mobs, called Hostile mobs, will seek you out in the environment to brutally murder you. They will ignore you the player in creative mode, but a surival mode player must watch their backs at all times. Hostile mobs can only spawn when the surrounding light levels are lower than a specific threshold. This means that they will most commonly spawn at night or in the darkness of caves. During the day, unless there is a thunderstorm, you the player will be safe from most mobs. The various surface hostile mobs are Zombies, brutes that bite and chase; Skeletons, skillful archers of the undead; Creepers, walking stacks of TNT with a proximity fuse; Spiders, great beasts that can mount any wall; and Enderman, the inky black monsters of the shadows. All of these mobs drop something, much like the animals, however that is only after you have defeated them in combat. Zombies and Skeletons cannot survive in sunlight and will combust come daytime, but Creepers, Spiders, and Enderman will continue to roam the surface ever after the sun has appeared. There are various other hostile mobs such as Ghasts, Blazes, and the Ender Dragon, but they are not applicable to our purpose. The Official Minecraft Wiki goes into complete detail on the behaviors, uses, and attribute of each of these violent creatures.

NPCs

Short for Non-Player Characters, NPCs are the only other humanoid inhabitants of the Minecraft world. Building small farming villages in planes, deserts, and savannas, these resourceful little merchants develop thriving economies completely apart from interaction with the player. IF you do happen upon an NPC Village, you can find multiple kinds of houses and farms. To interact with an NPC, right click them. This will bring up a trading menu where you can add to the flourishing wealth of the Minecraft Squiwards. Opening doors to gain access to their homes is accomplished by right clicking them. NPCs are not hostile, but can be hurt and posses a secret weapon that is incredibly dangerous to the player. Therefore, it is a good practice to stay away or on the good side of every NPC you encounter. Remember, they are people tool, with people grudges, and people skills.


The Minecraft Envionment as a Whole

Biomes

The Minecraft Environment is a diverse ecosystem, complete with various kinds of Biomes and weather. There are multiple kinds of Biomes that exist in the Minecraft world, including Deserts, Oak Forests, Extreme Hills, Ice Tundra, and Oceans. In the EML Full World, a Grassland and a Savanna can bee seen meeting just on the edge of the NPC village. Each biome presents its own unique kinds of plants and materials. Some trees can only be found (naturally) in specific kinds of Biomes. The Official Minecraft Wiki has all of the details about each Biome and a complete list of those that will appear in the world.

Weather

The weather fluctuates between Clear, Rainy, and Thunder. Thunder is dangerous to the players, their livestock, and their houses because lightning represents the single most destructive explosive force in the game. Lightening can cause fires, destroy solid stone, and instantly kill every kind of mob including the player. Also during thunderstorms, the light levels decrease and allow Hostile mobs to spawn at any time during the day. Rain is less severe and primarily annoying. Clear is as pleasant as you might imagine. The Day-Night cycle of a Minecraft day is approximately 20 earth minutes in length.


What You Have Learned

During this lesson you learned how to move and interact with the mine craft environment, established a basic knowledge of how to use some kinds of block, were introduced to some of the most applicable types of blocks and tools, met the animals, hostile mobs, and NPCs you share the world with, and gained a basic understanding of the overall environment Minecraft presents to you. An incredibly complex and beautiful world, Minecraft represents one of the most comprehensive virtual environments every produced by mankind. Welcome to this amazing world of creation, destruction, and discovery. Our next lesson focuses on another amazon attribute of the Minecraft World: Redstone. But until then...

Build on.
-Prof. Molitor
0 comments

Elab Internship: Week 4 Day 4

Week Four, Day Four

Thursday, June 25th, 2015

Educational Minecraft Lessons

Daily Goals

Today I plan to record the walkthrough for Minecraft: Learning the Ropes and propagate its associated wiki page. After completing that lesson, I plan to present to Dr. Wiecking to update him on progress and start a dialogue to improve the lessons. After that, I will continue work on the Robotics Class Remote Controller application. This application allows control of a robot over serial communication via a java GUI. There are multiple benefits to such an application, for control of the robots will no longer delimited to single line commands, but rather a flexible and real-time environment to control their various bots. I hope to complete this application by tomorrow afternoon or next week in preparation for the robotics class.

Daily Report

I have successfully completed the first lesson of the Educational Minecraft Sereies, "Minecraft: Learning the Ropes". I have both created the world associated with this lesson, propagated the corresponding Wiki information, and recorded a walkthrough of the lesson. I am still brainstorming as to where I am going to put all of this, and I endeavor to speak to Dr. Bill about setting up a course Wiki devoted to this curriculum.
I was also able start work again on the Arduino Remote Control Application I am building for the Robotics Class. I have created a GUI and am beginning on the communication protocol and specific functions of the remote.

Hours Report

Today: 7
Week: 30
Total: 133.5

0 comments

Elab Internship: Week 4 Day 3

Week Four, Day Three

Wednesday, June 24th, 2015

Minecraft Educational Lessons

Daily Goals

Today I will continue in-game development of the "Minecraft: Learning the Ropes" Lesson as well as record the walkthrough. Finally, I will brainstorm a means of conveying this information, wether that is using the current Minecraft EDU weblog or the creation of a Wiki Page.

Daily Report

I have completed development of "Minecraft: Learning the Ropes" by adding increased information presentation in the form of signs and in-game prompts and by increasing the overall aesthetic appeal of the environment. I will record the walkthrough tomorrow and propagate the Wiki. I have decided to create a wiki page on the Physics Server to host the first presentation of this information. However, development of an independent page will eventually be necessary to introduce this curriculum to other schools.

Hours Report

Today: 8
Week: 23
Total: 126.5

0 comments

Elab Internship: Week 4 Day 2

Week Four, Day Two

Tuesday, June 23rd, 2015

Minecraft Educational Lessons

Daily Goals

Today I compile my research into a draft of the Educational Minecraft Lessons (EML) layout and overall structure. I hope to land upon a method o organization and proposed implementation before starting development of the first Lesson, "Minecraft: Learn the Ropes", a complete walkthrough of the controls, block mechanics, and innate environmental features of Minecraft. This Lesson will equip students without experience with the game with the necessary tools to continue onto the consecutive modules. However, I endeavor to design these modules and system to be played in independent sections or in order. Decisions such as this are my primary concern today.

Daily Report

I have decided upon a three part organization for the EML: World, Web, Watch. This combines active playing within the Worlds I am designing, using the Web page and wiki to walk through the lessons and the generals of Minecraft and Watching me play through the modules explaining as I go along. The following video is NOT the final Watch component of the first module, but only a brief walkthrough of the structure I have devised for each lesson. The length and intensity will vary with the degree of difficulty associated with the tasks. This being the first one, is relatively long but not particularly complex.

Hours Report

Today: 7
Week: 15
Total: 118.5

0 comments

Elab Internship: Week 4 Day 1

Week Four, Day One

Monday, June 22, 2015

MaRs Check-In System

Daily Goals

Today, I will export both the Server and Remote Control Applications for deployment onto an Energy Lab Machine as well as find an appropriate location for the module. I have only attempted to export these applications once before without success, so I predict some degree of development associated with the complete implementation of this system. Hopefully, however, I can have this up and running today so that I might continue work on the Minecraft Educational Modules.

Daily Report

After much "monkeying", I was able to deploy the Server and Remote control to a computer, hoverer some issues have arisen that are impeding as complete progress as i would have hoped. Firstly, the exportation of the applications required more tweaking than I had anticipated. The largest hurdle was the repair of the local file references in processing. When run from the IDE, processing automatically referenced the chive sketch file for data without an explicit and complete file path. However when exporting, the file path must be described in terms of an absolute reference to the system. This is accomplished in processing with the syntax dataPath("")+localFilePath when reading files, referencing images, or interacting with databases. This hurdle was exacerbated by a mistake on my part in attempting to pad the application for cross platform function. Secondly, There is some kind of compatibility issue between the fully exported application (or the in-IDE for that matter) that does not cooperate with the modules when hosted on a machine with an IP set by the Energy Lab. I cannot at this time intelligently identify the reasons for this miscommunication, for more diagnostics of my system are needed. Therefore, there server is currently hosted on one of the laptops with the manual IP of 10.14.88.199. This, along with other similar addresses are the only ones interacting with the Modules thus far.
However, after a significantly less productive day than I had hoped, the Module, Server, and Remote Control are all functioning properly within the Elab. This deployment constitutes a break in development for a time to continue work on my other projects. Happily, everything is running relatively smoothly.

Hours Report

Today: 8
Week: 8
Total: 111.5

0 comments